Sunday 28 December 2014

Cornish Leather - Part 3


The dress is complete, the best part of ten months later!

What a project!  There was so much to do and learn that I found it difficult to blog about it all at the time.  I've learnt how to:

1.  Make cuffs and rouleau loops, plus secure shanked covered buttons


Made b y http://www.buttoncovering.co.uk/.  How great do these look with covered backs?!
2.  Make a continuous lap on a sleeve (what you get on men's shirts)


The lap when it's shut
3.  Work with leather


4.  Pattern match
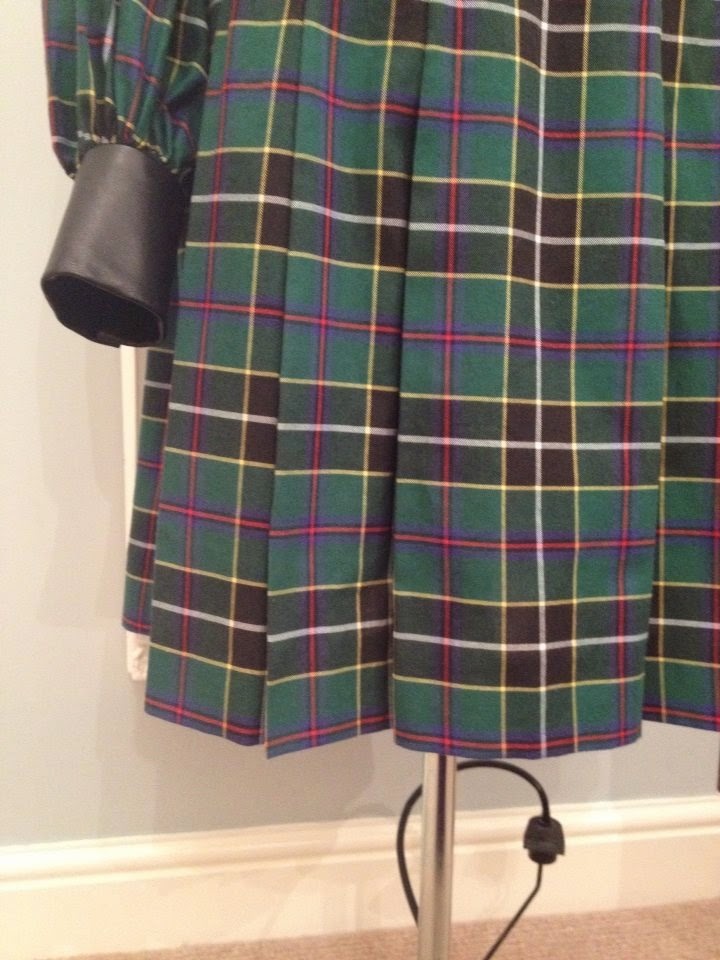
The white line runs vertically down the centre of the dress and each pleat matches
5.  Prevent waist stretch by securing a thin petersham ribbon to the waist seam allowance

6.  Blind hem by hand

  7.  (most importantly) press pleats!  What a pain that is. 


I'm very happy with it, the only thing left to decide is when to wear it for the first time?!


Tuesday 23 December 2014

Lined curtains - Part 2

Well its been a while but the lining is now complete and has been attached to the curtains. Here's my little instruction guide for attached lining curtains.

I started by cutting four pieces of lining fabric each 213.5cm long.

This measurement is the length of the window + 30 cm (15cm above and 15cm below the window) + 12.5cm (Double hem of 7.5cm MINUS 2.5cm from the top).

It was difficult to work out the right and wrong side of this fabric so I made sure I marked the right side on all four pieces (as well as marking the top of each piece!)

The bottom has been pressed up 7.5cm and then another 7.5cm and machine stitched using a straight stitch approximately 2mm from the folded edge. I'm using my new Bernina which is such a treat!

Next I lay out a curtain and lay out a lining on top of it with wrong sides together.  I centred the lining on the curtain vertically and horizontally it is 2.5cm from fold.  I placed a few pins to secure the two fabrics together.  Then came the fun of attaching them vertically using lock stitches.  I did this at the following points which I've shown just on the curtain:
The centre is the first place you secure.  Then, for each side of the centre, secure half way between the centre and just inside the side hem.  Finally, secure just inside the side hem.
To make the lock stitches:

Secure a very long single thread to the curtain near the hem.  Make a small stitch by just picking up one thread from the lining and one thread from the curtain.


Pull your needle over the thread to form a loop.  Repeat.


It seems like a big job, bit it doesn't take too long.


Once I did that, I hemmed the lining sides.

To hem the lining sides:

  • Fold the lining sides back on themselves (right sides together) until each fold is in line with the mitred corner where it was ladder stitched.  Pin.


  • Continue the fold up the length of the lining.  Continue to pin and finger press the fold ensuring the distance from the lining fold to the edge of the curtain is the same up the length of the lining. 


  • Mark the lining 2.5cm from the fold you just made and trim along these markings to remove any excess.  The 2.5cm will be the lining side seam. 

  • Now remove the pins and turn the 2.5cm under, so that you finger press along the crease you made earlier but this time the 2.5cm seam is sandwiched between the wrong sides of the curtain and lining. Pin as you go.  Ensure that the distance from the lining fold to the edge of the curtain is the same up the length of the lining.
  • Slip stitch the lining sides to the curtain.


  • To finish off, secure the bottom edge of the lining to the curtain using swing tacks (for a 'how to' see my post from January 2013 "Liberty print jacket - Part 4").  Make the swing tacks at the centre and then half way between the centre and the edge of the curtain on both sides.  So you will have three swing tacks on each curtain. 


And there you go, the lining is complete.

The final stage for me is to attach the curtain tape.  I don't think I'll get them done before Christmas now considering I've got four to do and lots of mince pies to eat!

Merry Christmas

Sunday 24 August 2014

Lined curtains - Part 1

Over Easter time, when re-enrolling on my dressmaking course for the Summer term, I decided to look for a soft furnishings class.  I haven't been able to find any curtains to go in my redecorated room since it was completed a year ago.  I'm not a fan of my blinds so I was pleased to find a weekly soft furnishings and re upholstery course at my local library which is run by Bury Adult Learning.

The tutor got me started straight away on a sample fabric as if it was a curtain.  I am making lined curtains so I started on my sample with mitring the corners which are secured using ladder stitch.  A blind hem stitch secures the hem and a herringbone stitch secures the side hems.

The next session was all about my material.  I had measured my windows (I'm making two pairs of curtains), and added the following allowances to calculate how much fabric to buy:
  1. Added 15cm to top, bottom and both sides (this will be how much the curtains overlap the windows)
  2. Added 25cm to the length and doubled the width (the addition to the length is for the seams and the addition to the width is for the curtain gathers).
I opted for a fabric from Clarke and Clarke's Quantum range called Oberon in Duck Egg (http://www.clarke-clarke.co.uk/collection.php?hdnCollectionID=47).  It is standard width, 138cm and, luckily for me, I only needed two widths to make each pair of curtains. This meant that I had to add the pattern repeat, 14cm, four times for the four cuts I would be making,  This brought my total fabric requirement to 11m.

I was really impressed with the customer service from the-millshop-online (http://www.the-millshop-online.co.uk/curtain-upholstery-fabric-clarke-clarke-oberon-red-polycotton-1.html) which provided a free sample and dealt efficiently with my stock enquiries.  Not to mention the fabric was rolled perfectly on a cardboard tube (so no annoying creases!) and delivered the next day, just in time for class.


The great thing about this fabric is it's geometrical print which makes it easy to cut a straight line following the pattern.  I decided that I wanted the bottom of the curtain to end through the centre of each diamond shape (horizontal black line).  I therefore cut 20cm below the black line and pressed the seam allowance under by 10 cm then 10cm again. For the side hems I was advised to turn under 4cm and then 4cm again. Luckily this landed perfectly on the vertical black line.

As there was a lot of material it took me some time to accurately press all the seams in place, in the region of an hour per curtain.


Next, after deciding to use lead weights, I made eight fabric pouches on the sewing machine and finished the open seam by hand.

Then it was time to hand stitch the curtain seams:

1.  Place two pins where the hem and side hem overlap on each side of the curtain.

2.  Unfold the hem and side hem.
3.  Fold the fabric through the pins.

4.  Place a covered lead weight under the fold of fabric 2.5cm in from the hem and side hem on each side.  Secure them in the same way you would secure a button. 


5.  Re-fold the fabric along the creases previously made.  Press.

6.  Ladder stitch the mitred corners.
7.  Blind hem stitch the hem.


8.  Herringbone stitch the side seams.


    9.  Approximately four hours later this is what you'll end up with:

    I'm two down, two to go before I get to the lining and my machine can take over the hard work!

    Saturday 24 May 2014

    Cornish Leather - Part 2

    I've been very quiet on this project for the last three months and very busy matching tartan!

    I decided to start with stitching the skirt.  Once the front and front side pieces were joined (and the same for the back) the time consuming job of stitching the pleats followed.  There are 16 pleats in this skirt and the tartan pattern needed to match perfectly on each one.  This took a lot of effort and time but the effect is a professional finish and was achieved with a walking foot. 


    Topstitched pleats
    I began the bodice construction, again using a walking foot to help prevent the tartan from moving under the machine.  The process was simple until I came to attaching the collar which I am making in leather.  

    Firstly I needed to cut my leather and to do this I made another copy of my collar and cuff pieces.  I just about managed to fit them on to my skin and secured them temporarily with clips and sticky tape.  I cut them with fabric scissors which worked wonderfully, probably because the leather is less than 1mm thick.  

    I then deviated from the pattern's methods and made up the collar by stitching the collar and collar facing right sides together.  I layered and snipped the seam before turning right sides out.  I finger pressed the seam open and then finger pressed it shut from the right side of the leather.  I then basted the collar, facing side down, to the right side of the bodice.  Next I had to baste the wrong side neck facing to right side collar and then cut the neck opening.  To secure the stitching on the machine I used leather needles and a long stitch. Most importantly I went slowly as once the leather is pierced the needle holes will not close up. 

    All that was left to do was grade the seams (I cut all layers to 1cm and then cut both leather layers a few millimetres shorter) and snip the curve.  I under stitched the neck opening to keep the facing in place.
    Before under stitching the neck edge I tried a sample of my leather and tartan only to discover that the leather would not pass properly under the machine foot.  This problem hadn't occurred when stitching the collar together as the wrong sides are suede.  Ideally I needed a Teflon foot but I don't have one.  So I improvised as below:
    Masking tape covers the neck facing to protect it from the silicone
    Spraying the leather with silicone spray will help it glide under the presser foot

    The silicone spray worked really well and the presser foot didn't mark the leather.  This is the finished collar:

    The pins are there temporarily to encourage the leather to lie flat


    I'm glad to say that leather isn't as difficult to sew with as the novice me assumed.  It's true that once you have pierced the leather the hole will remain and that can be daunting.  I tried to put that out of my mind and focused on making sure everything was tacked well and that I stitched slowly.  No disasters resulted and I am pleased with the appearance of the collar.

    Now I am moving on to attaching the skirt and bodice and making up the sleeves with leather cuffs.  It's probably about time to get my matching buttons made as well!  So near yet so far...

    Wednesday 12 March 2014

    'Kiss' cushion

    Finally, FINALLY, I have completed this project!
    I first featured my progress on this embroidery back in October 2012, see post 'Out with one project...'

    I am incredibly slow at finishing projects because I have so many on the go at once but I didn't anticipate it would take me into 2014 to finish it.  I must have started it around end 2010! 

    I love this embroidery design by Emily Peacock and I am delighted with how the finished embroidery looks. Just the 'Hug' cushion to go now then...!  

    To construct the cushion cover I followed a really detailed two part tutorial by Nicole at Maven + Maison (http://www.mavenandmaison.com/.)

    Materials needed
    Here are the links:

    I made a few little tweaks (in italics).  Here is a brief outline of the process I followed:

    Steps 7 to 8
    1.       Wash, dry and iron all fabrics and trimmings (including embroidery – cold water);
    2.       Apply lightweight iron on interfacing to wrong side of embroidery (it should measure design size + 1.5cm all around);
    3.       Trim finished embroidery leaving a border of 1.5cm all around;
    4.       Cut upholstery fabric to the same size;
    5.       Over lock edges;
    6.       Mark opening for zip which should be central;
    7.       Insert one side of zip on upholstery fabric;
    8.       Apply length of trim to the bottom edge of the embroidery and machine into position;
    9.       Insert the other side of the zip on top of the trimmed edge making sure the zip is aligned correctly;
    10.   Finish seams at either end of the zip;
    11.   Apply length of trim to the top edge of the embroidery and machine into position;
    12.   Pin and tack the three loose edges of the cover together and machine;
    13.   Cut diagonally close to stitching at corners and over lock;
    14.   Turn and insert cushion pad.


    I would recommend following the tutorial at Maven + Maison if you are making any cushion cover with a trim; it's simple to follow, easily adaptable to your needs and has a professional finish with the concealed zip.


    The cost of this project isn't for the faint hearted as you will see below; Having said that, I don't think it's worth scrimping and scraping on the upholstery fabric or the trim - the detail is what makes it!  Take it from me that if you spread the cost over a few wage packs it is a little easier to stomach.  And not forgetting this sells for a whopping £375 (http://www.notonthehighstreet.com/maisonami/product/kiss_tapestry_cushion).

    Item Supplier Quantity £
    Kiss' tapestry kit, small http://www.emilypeacock.com/ 1 (bought with 'Hug' for discount) 50
    27'' x 9'' feather cushion pad http://www.thefeathercompany.com/ 1 14
    White Knightsbridge upholstery fabric http://www.remnantkings.co.uk/ 0.5m @ £12.90 per metre 6.45
    White bobble fringe, large  http://www.deckchairstripes.com 1.75m @ sale price of £7.20 per metre (usually £9 per metre) 12.6
    White YKK concealed zip, 22 inches http://www.sewessential.co.uk 1 2.96
    Thread and lightweight interfacing Any haberdashery - already had
    TOTAL 86.01

    It fits perfectly on my one seater!

    Has anyone else made this embroidery into a cushion cover?  I'd love to see some photos!